Not seeing items you’ve added? Sign in
Tips & Advice
Car Seats in Rideshares, Carpools, and Rental Cars: What Changes and What Doesn’t

As a caregiver, you've put a lot of time and research into selecting the right car seat for your family, lifestyle, and vehicle. After a few practice rounds and maybe even an appointment with a Child Passenger Safety Technician (highly encouraged!), you've installed the seat confidently and securely in your vehicle, and you're ready to travel safely with your little one. But what happens when you need to install the seat in an unfamiliar vehicle like a rideshare or rental?
The short answer: The car may change, but the safety basics do not. Whether you’re driving the familiar family car or borrowing one for vacation, your child should always ride in a harnessed car seat or booster seat that’s appropriate for their height, weight, and developmental level. The seat should be installed securely according to the manufacturer's instructions and adjusted to fit your child properly.
What does change, however, is the planning. Navigating rideshares and rentals with car seats takes a little more practice and preparation than everyday rides in your own car. By taking the time to prepare and familiarize yourself with your car seat, you can help keep your child safe and avoid last-minute scrambling.
Safety Basics
Remember: Whether you're hopping in a rideshare or installing your child's seat in grandma's vehicle, car seat safety basics stay the same. Make a mental checklist (or, better yet, save one in your phone) that you can refer to for a secure, confident setup:
- Choose an Appropriate Location for Your Child's Car Seat
- The back seat is the safest place for a child to ride. The American Academy of Pediatrics recommends that children remain in the back seat until 13 years of age.
- If you plan to install the seat using the Child Restraint Anchorage System (formerly LATCH), you’ll need to identify a designated seating location with lower anchors (read more on identifying designated seating locations below).
- Be mindful of vehicle airbag locations. Rear-facing car seats should NEVER be placed in front of an active airbag.
- Booster seats must be placed in a vehicle seat with a lap-shoulder belt, NOT a lap-only belt.
- Backless booster seats should be placed in a vehicle seat with a head restraint.
- Install the Seat Securely Using Either the Seat Belt or the Lower Anchors
- Do not use both installation methods unless your car seat user guide AND the vehicle user guide expressly permit it. You probably won’t have quick and easy access to the vehicle user guide for rideshares, so we recommend that you plan to install the seat using just one method.
- Once installed, the seat should move no more than 1 inch side-to-side or front-to-back at the belt path.
- Check Your Child’s Fit
- Ensure that the harness height is adjusted properly according to the instructions in your user guide. If you’re moving your child's everyday seat from your vehicle to a rideshare or rental, the harness straps should already be adjusted correctly. If you can’t remember the last time you checked, there’s no time like the present! Take a moment to check your child’s fit to ensure that the harness straps are positioned appropriately based on their height and orientation (rear-facing or forward-facing).
- The harness should be snug against your child so that you cannot pinch any of the webbing vertically at your child’s collarbone
- The chest clip should be at armpit level.
- For booster seats, the seat belt must be routed correctly according to the user guide. The lap portion should rest low across your child’s hips (not their stomach), and the shoulder portion should cross the middle of your child’s shoulder (not their neck or face).
- Coats & Bulky Clothing
- Heavy coats and clothing should be removed before you secure your child in their seat to help prevent harness slack. Once the harness is buckled and adjusted correctly, you can place your child’s coat on top of the harness to help keep them warm.
Know Your Car Seat
You probably won't know the exact make and model of your rideshare or rental until a few minutes before it’s time to buckle up. But, when you bring your own car seat, you will have the advantage of knowing how your specific seat works. Learning the ins and outs of your child's seat ahead of time can save you a lot of stress in the moment. Here are a few practical ways you can get to know your child's car seat to help make rideshares, rentals, and carpools easier:
- Learn Both Installation Methods: Every vehicle is different. The car seat installation method that you feel confident and comfortable using in your car might present challenges in an unfamiliar vehicle. So, it’s best to prepare a backup plan. Familiarize yourself with seat belt installation and lower anchor installation, practicing both methods in your vehicle so that you’ll feel comfortable using either one when the time comes. As you practice installation, go through your user guide and take note of a few key details about your seat:
- Does it have a built-in seat belt lock-off? If not, be prepared to lock the vehicle seat belt manually.
- What is the lower anchor installation weight limit for each car seat mode? You can find these printed on the labels on your car seat. If your child is over the limit, you must install the seat using the vehicle seat belt. It’s also important to note that some vehicles may have a different child weight limit for the lower anchor installation method than the car seat itself. You may not have time to look up the vehicle’s lower anchor weight limit when installing your child’s seat in a rideshare. When it comes to rideshares and other time-sensitive situations, be prepared to install the seat using the seat belt method.
- Practice Installing the Seat Without the Base (Infant Seats Only): If your child is in a rear-facing only seat with a base, it may be easier to navigate rideshares without the base. Review the instructions in your user guide for baseless installation and practice in your vehicle to help make rideshare pickups smoother.
- Review Recline Adjustment Instructions: Vehicle seat angles can vary by make and model. The recline setting you normally use in your car might not work in a rideshare or rental. Review your user guide and ensure you understand the recline guidelines for your seat and how to adjust the angle if needed.
The next time you need to travel with your child in an unfamiliar car, you can take comfort knowing that you'll be working with a car seat you already know how to use. Take time to review the user guide, practice installing the seat, and reach out to the manufacturer's customer service team with questions if needed.
Identify Lower Anchor and Tether Locations
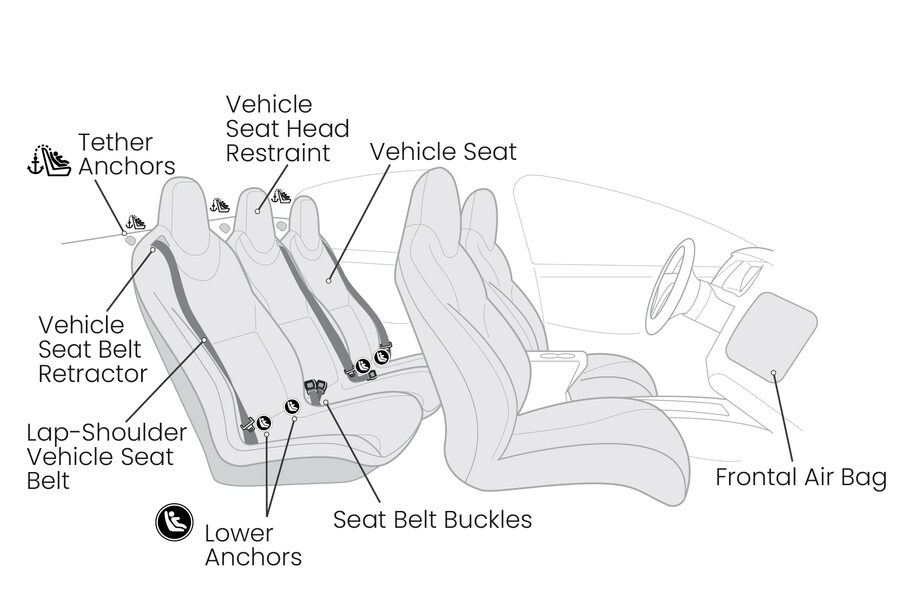
Being able to locate lower anchors and tether anchors quickly and easily can help you save time and stress when getting into a rideshare or borrowed car. Most vehicles manufactured after September 2002 are required to have at least two designated seating positions with lower anchors and a tether anchor, plus one additional seating location with a tether anchor.
Even if seat belt installation is your go-to, it's a good idea to be able to locate and use the lower anchors in case installation challenges arise (provided, of course, that your child is not over the weight limit for lower anchor installation). Lower anchors are metal bars built into the vehicle, usually located in the crease where the vehicle seat cushion meets the back of the seat (this is called the seat "bite"). If the lower anchors aren't immediately visible, look for the lower anchor symbol somewhere nearby. It's usually on a plastic button or tag.

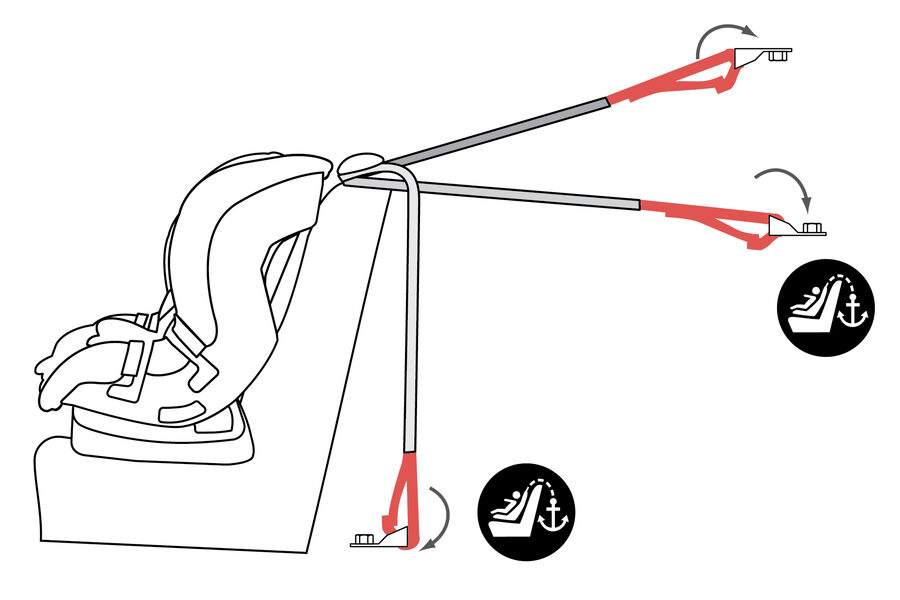
The car seat tether is designed to help stabilize forward-facing harnessed car seats and minimize movement in the event of an impact. Britax strongly recommends that the tether be used for all forward-facing harnessed car seats, whether the seat is installed with the seat belt or the lower anchors. (Note that in Canada, use of the tether for forward-facing harnessed seats is required). Select models, like the Galaxy360™, also permit tether usage in rear-facing mode.
Tether anchor locations vary by vehicle type. Use the diagram below as a quick reference for common tether locations.
Now that you've reviewed the safety basics and your car seat user guide, you're more prepared to tackle car seat setup in an unfamiliar vehicle. Let's take a look at some more specific tips for rideshares, rentals, and carpools to help you ensure a smooth setup.
Rideshares
- Plan Ahead & Order Early: Plan ahead to help avoid last-minute scrambling, and schedule your rideshare in advance, if possible. Make sure you incorporate enough time to install the seat, secure your child safely, travel to your destination, and uninstall the seat.
- Choose a Larger Rideshare for Additional Space: If you’re traveling with multiple children or if you have lots of luggage, an XL rideshare might be a better option.
- Select a Safe Pickup Spot: Choose a spot away from traffic where you can install the seat safely. If a street pickup is the only option, install the car seat on the side of the vehicle away from the street, if possible, so that you can stand out of the way of traffic.
- Have Your User Guide Handy: Pull out the physical user guide that came with the seat and put a bookmark in the installation section. Or, have the digital version ready to go on your phone in case a question arises.
- Communicate With Your Driver: As soon as you book your ride, use the messaging feature within your rideshare app to let your driver know that you have a car seat and a child with you. When they arrive, let them know you’ll need a few minutes to set up the seat (since they’ve been driving, they may not have seen your message). Don’t be afraid to ask the driver if you can adjust the vehicle headrests or move the front passenger seat up to create more space for a rear-facing car seat, if needed.
Key Takeaway: Remember, child safety isn't bound by a schedule. Take your time, ask your driver for extra time if needed, and ensure a secure installation and proper fit just as you would in your own vehicle.
Rental Cars & Borrowed Cars
When you install a car seat in a rented or borrowed car, you'll have a little more flexibility and control. You won't have to worry about communicating with a driver or trying to find a good pickup spot. With that in mind, it's still important to incorporate enough time in your travel schedule to install the seat confidently and correctly.
Here are a few factors to consider when traveling with children in a rented or borrowed car:
- Space: When reserving your rental car, request a size/body type with enough space to accommodate all passengers, car seats, and luggage. See if your rental car company offers the option to reserve a specific make and model (this may cost extra).
- Time: Ensure that there’s enough time in your travel schedule to pick up your rental car and install your car seat. You may need more time than you think, as your go-to installation method may present challenges in a new vehicle. Be prepared to install the seat in a different seating location or with a different installation method.
- State Laws: Car seat laws vary by state and province. For example, some states require children to ride in a rear-facing car seat until 2 years of age, while other states do not have an age requirement for moving from rear-facing to forward-facing. You should always follow the laws for the state in which you are driving. If you’re traveling out of state, look up the laws for your travel destination to ensure your child meets all requirements for the type of seat they’re using. You can find U.S. state laws on the Governors Highway Association website. For Canadian residents, use the map feature on the Canadian Automobile Association’s website to look up laws by province.
- Safety Essentials: As noted above, the basic safety rules for car seats don’t change just because you’re installing the seat in an unfamiliar car. Install the seat securely according to the manufacturer’s instructions and ensure your child is secured properly.
- User Guides: Have your car seat user guide handy, either in physical or digital format, in case questions arise during installation. If you need to look at the vehicle user manual, you should be able to find it online. Many rental car companies don’t leave the owner’s manual in the glove compartment, so be prepared to look it up on your phone.
- Vehicle Controls & Features: Before driving away, take a few minutes to familiarize yourself with the basic vehicle features and controls. Test out the wipers, turn signals, air conditioning, entertainment and information systems, and headlights. If you’re traveling with another passenger who is old enough to sit in the front seat, allow them to be in charge of climate and entertainment controls so you can minimize distractions while driving. Taking a few extra minutes to get used to an unfamiliar vehicle can go a long way toward keeping you, your passengers, and everyone else on the road safe.
Key Takeaway: When installing a child car seat in a rental car, take your time just as you would when installing the seat in your own vehicle at home. Check for a secure installation, trying an alternate installation method or seating position if necessary. If you're traveling out of state, look up local car seat laws ahead of time.
Carpools
Like rental cars, carpools give you the advantage of planning ahead. You can figure out how many passengers you'll have, what kind of car seat each child needs, and where each seat should go in your vehicle. However, don't let the familiarity of a carpool routine become an excuse to let best practices slip. Car seat safety basics stay the same, whether you're driving just one child or a carful.
- Discuss Car Seat Safety and Set Expectations With Other Drivers: Any time your child needs to ride in a car with someone new, review car seat safety and your expectations with that driver. Even the most well-intentioned caregivers might not be up to date on best practices, especially if they haven’t driven with a child in the car for a long time.
- Plan Out Seating Configurations: Don’t wait until you’re in the school pickup line to figure out where each child’s car seat should go. Plan ahead and consider the number of passengers as well as the type of seat each child is using.
- Don’t Compromise: When you’re driving with more little passengers than you’re used to, it’s easy to feel rushed and overlook potential safety issues that you would normally address. During your carpool shifts, take your time to ensure that every child is secured correctly in a properly installed car seat. Check each child’s harness or seat belt to ensure proper fit before driving away.
- Prioritize Safe Driving: Having multiple passengers can also be a potential distraction for drivers, especially when those passengers are energetic little ones. Keep your eyes on the road and stay alert at all times. If one of the kids in your car needs help with something, find a safe place to pull over and put the vehicle in park before providing assistance.
Key Takeaway: Follow car seat best practices during every carpool ride to help ensure the safety of every passenger. Plan out seating arrangements ahead of time, ensure that every child is secured correctly, and stay focused while driving.
Other Questions About Car Seats in Rideshares, Rentals, and Carpools
Q: I live in a city and plan to use rideshares frequently. What should I look for when purchasing a car seat?
A: For city living and frequent rideshares, look for a seat that's lightweight and portable. Remember, once you arrive at your destination, you'll have to carry the seat with you. You should also consider installation. Remember, the best kind of car seat is one that you can install properly and confidently. See if you can find a baby gear store in your area that will let you practice installing different types of car seats. That way, you can find one you feel confident with. If you're shopping for an infant car seat, look for one that you'll be able to install easily without the base. Baseless installation can be more convenient for rideshares, giving you one less thing to carry around.
Q: When traveling, should I rent a car seat or bring my own?
A: We recommend bringing your own car seat. While renting a car seat may seem like a convenient option, it introduces several risk factors that can be avoided by bringing your own seat, such as:
- Unknown car seat history & condition: You won’t be able to verify whether or not the rental seat has been involved in a crash or whether previous users caused any damage that could compromise the integrity of the seat.
- Missing parts, labels, or manuals: There’s a chance that the rental company will remove or even discard the car seat manual, making it more difficult for you to look up installation instructions and usage information. Important car seat labels may have been removed or damaged (making them impossible to read), and crucial parts like harness pads and infant inserts may have gotten lost.
- Lack of availability: Even if a company advertises car seat rentals, there’s no guarantee that they’ll have one that fits your child when you arrive. By bringing your own seat, you can help ensure that your child will be able to ride in the rental car safely.
Planning, Practice, & Knowledge: The Keys to Confident Journeys
You can prepare for confident journeys with your children in rideshares, carpools, and borrowed cars by planning ahead, practicing installation, and getting to know your seat as well as car seat safety basics. The car, driver, and other circumstances may change, but car seat safety doesn't. Always take your time, install the car seat correctly according to the manufacturer's guidelines, and secure your child properly. Happy travels!
Was this helpful?